Introduction: The Foundation of All Great Woodwork
The difference between a heirloom-quality piece of furniture and a wobbly, amateurish project often comes down to one single, critical element: precision. In the world of woodworking, precision is born from a deep understanding and consistent application of accurate measurements. A fraction of an inch might seem insignificant, but when compounded across multiple cuts and joints, it can be the deciding factor between a project that fits together perfectly and one that ends up as firewood.
For the aspiring American woodworker, stepping into the workshop can feel like entering a world with two conflicting languages. You are raised on the Imperial system—inches, feet, and fractions—but you'll quickly discover that a significant portion of quality plans, high-end tools, and international woodworking content use the Metric system—millimeters and centimeters. This duality can be incredibly confusing, leading to costly mistakes and a steep, frustrating learning curve.
But what if you could master both? What if you could read any plan, use any measuring tool, and approach any woodworking project with unshakable confidence? This article is your definitive guide to demystifying the world of woodworking measurements. We will systematically break down both the Imperial and Metric systems, provide you with the only conversion rules you'll ever need, and equip you with the knowledge of essential measuring tools and techniques to ensure every cut you make is perfect. By the end, you won't just be following plans; you'll be building with a newfound level of expertise, understanding exactly how to measure for woodworking like a seasoned pro.
This guide will cover everything you need to know about measuring and marking for your next project.
{getToc} $title={Table of Contents}
Part 1: Mastering Imperial Woodworking Measurements
The Imperial system, with its fractions and seemingly arbitrary numbers, is the traditional language of the American carpenter. While it can appear complex, once you understand its logic, it becomes second nature. Mastering it is the first step toward achieving quality woodworking.
1. How to Read a Woodworking Tape Measure
The tape measure is arguably the most frequently used measuring tool in any workshop. It's an extension of the woodworker's hand, yet many only use a fraction of its potential. Reading a tape measure in inches is a fundamental skill, and we're here to make sure you get it right.
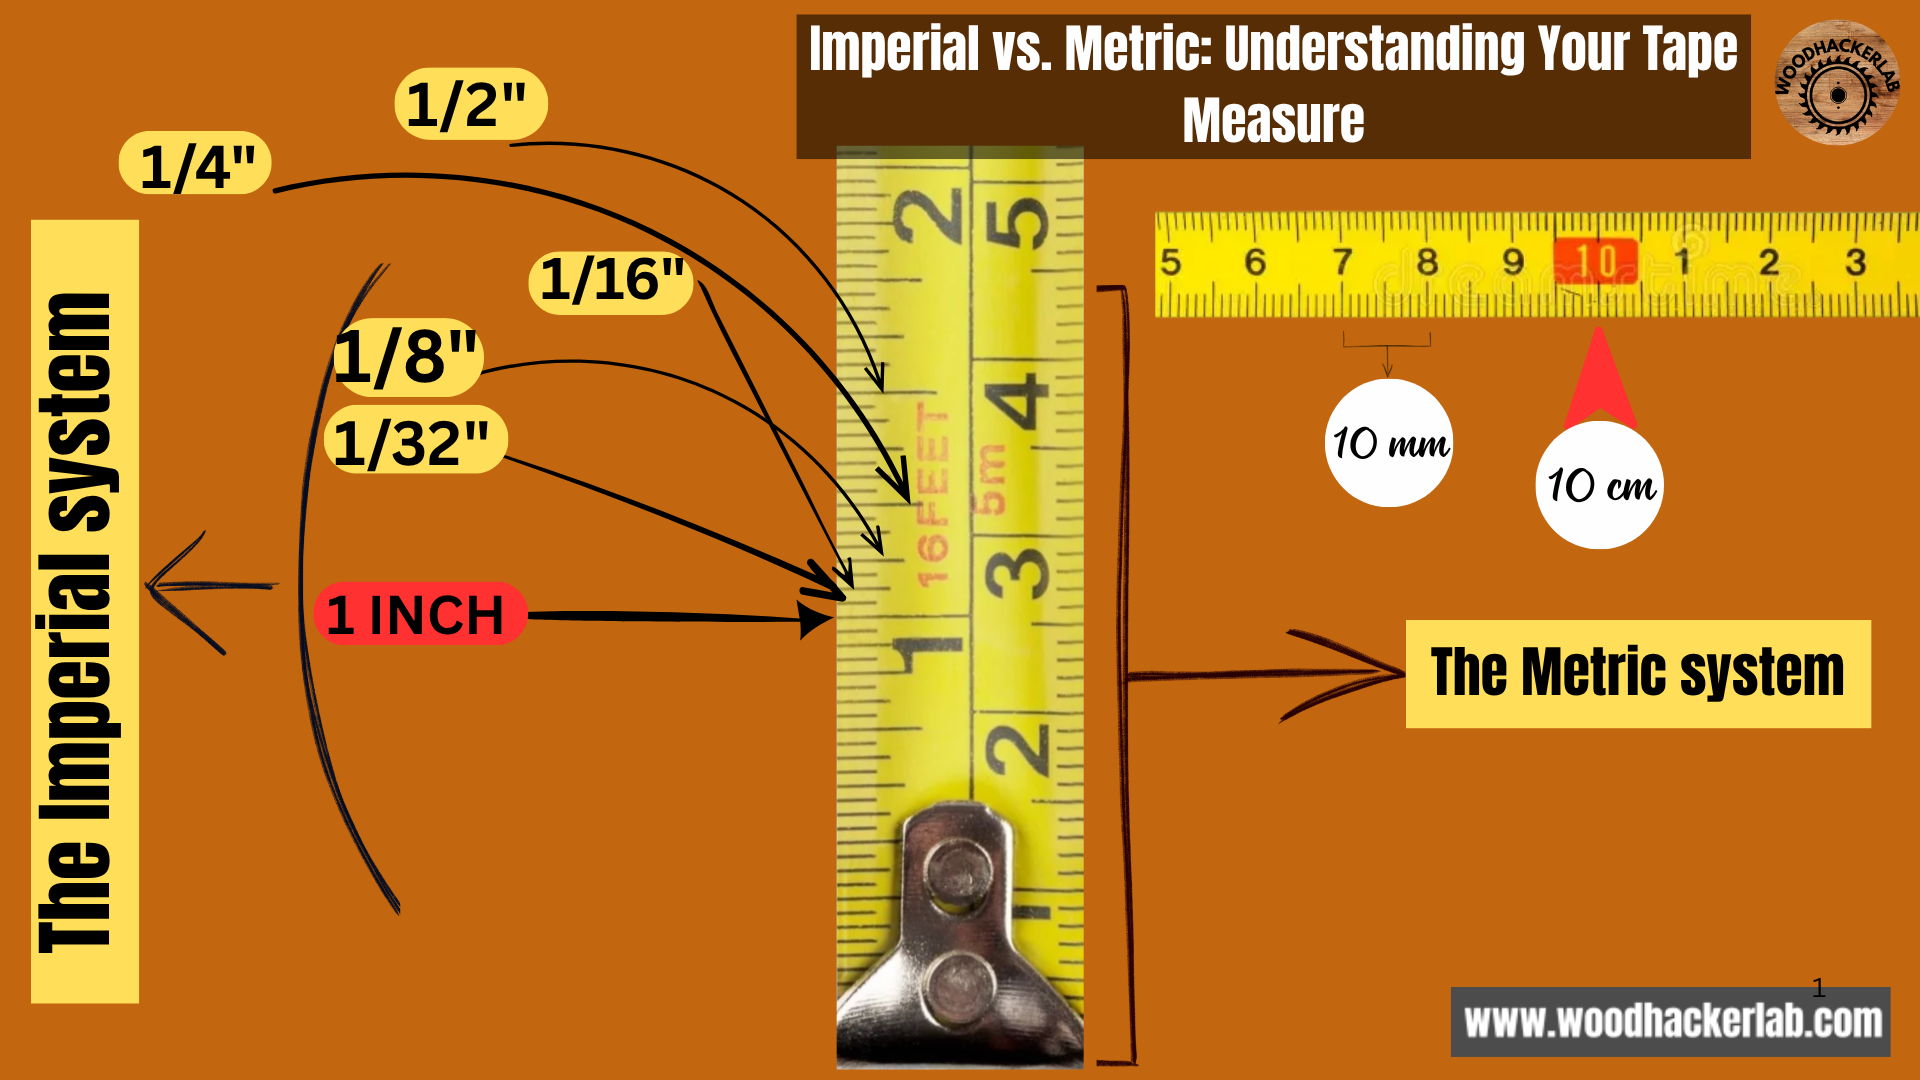
A standard tape measure in the United States is marked in inches. Each inch is typically the largest, most prominent number on the blade. But the real story is in the marks between the numbers.
- The Inch: The foundation. Every measurement starts here.
- Half Inch (1/2"): This is the longest mark within an inch. It's exactly halfway between two inch marks.
- Quarter Inches (1/4" and 3/4"): The next longest marks divide the inch into four equal parts.
- Eighth Inches (1/8", 3/8", 5/8", 7/8"): These marks are slightly shorter still, dividing the inch into eight equal parts.
- Sixteenth Inches (1/16", 3/16", 5/16", etc.): These are the smallest common marks on most standard measuring tapes, dividing the inch into sixteen tiny segments. For most woodworking tasks, accuracy to 1/16" is the gold standard.
Beyond the inch, you'll find the foot. On most measuring tapes, the numbers for inches restart at each foot, but are often a different color (e.g., red) to make them easy to identify. Remember :
1 foot is always equal to 12 inches.
Pro Tip: The "Ignore the Small Marks" Trick
When you're first learning, the sea of tiny marks can be overwhelming. Here's a trick: focus only on the largest numbers and marks. Find the nearest whole inch. Then, find the half-inch mark. Is your line before or after it? By systematically narrowing down the possibilities, you can read any measurement with confidence.
2. Common Imperial Fractions in Woodworking
In woodworking, you'll encounter a handful of fractions repeatedly. These aren't random; they correspond to the standard thicknesses of lumber and sheet goods. Memorizing them will speed up your work immensely.
| Fraction | Decimal Equivalent | Common Use in Woodworking |
|---|---|---|
| 1/8" | 0.125" | Thin veneers, delicate trim |
| 1/4" | 0.25" | Thin plywood, some back panels |
| 3/4" | 0.75" | The Standard. Most construction lumber, hardwood, and plywood. |
Understanding that a "2x4" is not actually 2 inches by 4 inches is a critical woodworking tip. Due to drying and planing, its final dimensions are closer to 1.5" x 3.5". This is where precise measurements are non-negotiable.
Building a cabinet frame assuming your 2x4s are a full 2 inches wide will result in a project that doesn't fit together. The same goes for plywood; a 3/4" sheet is your benchmark for many joinery calculations. The accuracy of your measurement down to 1/16" is what allows for tight-fitting joints like a mortise and tenon, where the difference between a snug fit and a sloppy one is just a fraction of an inch. This is the foundation of precise woodworking.
Part 2: The Metric System for Precise Woodworking
If the Imperial system is a collection of historical conventions, the Metric system is a triumph of logical simplicity. For woodworking tasks that involve complex calculations, it offers a clarity that can dramatically reduce errors.
3. Using the Metric System for Accurate Measurement
The Metric system is based on units of ten. There are 10 millimeters (mm) in a centimeter (cm), and 100 centimeters in a meter (m). This base-10 structure means no more complex fraction addition or subtraction.
Most professional woodworking plans, especially those of European origin, use millimeters exclusively. Why millimeters instead of centimeters? For maximum precision. By using millimeters, you work with whole numbers, which are far easier to mark accurately and less prone to misreading.
Pro Tip: Why Professionals Prefer Millimeters
The primary reason many seasoned woodworkers, even in the US, prefer the metric system for layout is that it eliminates fractions. Fractions are the source of many woodworking mistakes. By removing the cognitive load of dealing with fractions, a woodworker can focus on the more critical aspects of the craft, like joinery and wood selection, leading to more accurate results.
4. Converting Between Imperial and Metric: The Only Numbers You Need
While it's best to work entirely within one system for a given project, sometimes you need to make a conversion. Don't get bogged down with complex charts. You only need to memorize two simple conversions.
- 1 inch = 25.4 millimeters
- 1 foot = 30.48 centimeters
That's it. For on-the-fly conversions, a smartphone app is your best friend. But the ultimate measuring tool for the global woodworker is a tape measure that has both Imperial and Metric scales printed on the same blade.
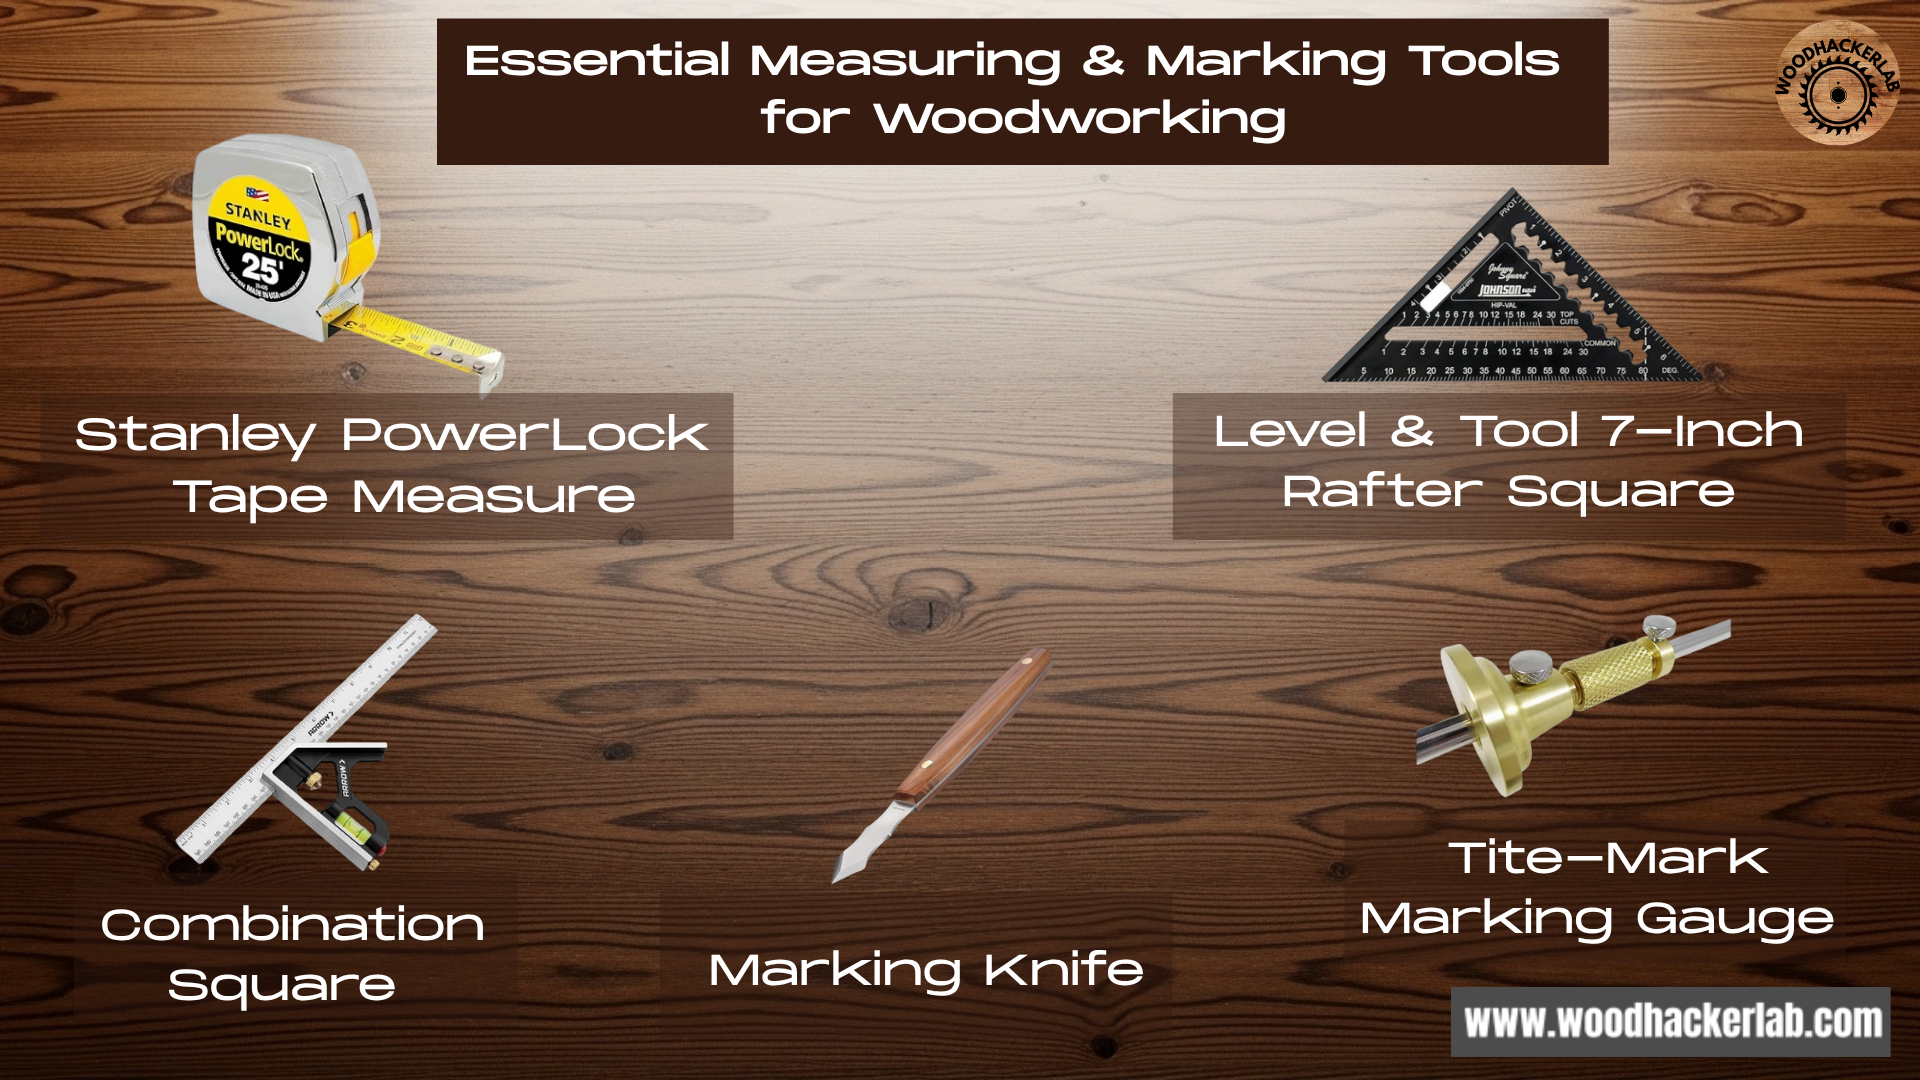
The Global Woodworker's Companion: The Stanley PowerLock 25ft x 1-inch Tape Measure features both Imperial and Metric markings, a durable blade, and a reliable locking mechanism. It's the perfect high-quality measuring tool for any workshop.
Ready to Apply What You've Learned?
You've mastered the theory of measurement, but real skill comes from practice. Start your hands-on journey today with 50 professional, free woodworking plans.
» Get Instant Access to 50 FREE Plans + a 440-Page Guidebook!Part 3: Essential Measuring and Marking Tools & Techniques
A perfect measurement is useless if it's not transferred accurately to your workpiece. This is where the art of marking comes in. Using the right tools for accuracy is just as important as taking the initial measurement. Investing in quality tools here will pay dividends in every project you build.
5. Your First Set of Measuring and Marking Tools
Combination Square
This is the quintessential woodworking tool and a true must-have. A good combination square does so much more than check for 90-degree angles.
- Its adjustable head can slide along a steel ruler to mark parallel lines.
- It can set the depth of a saw cut.
- It's perfect for checking the square of a machine's fence.
Look for one with a sturdy locking mechanism and a finely etched steel rule.
Our Recommendation: The IRWIN Tools 12-Inch Combination Square offers a durable steel rule and a reliable locking mechanism, making it a perfect first investment for any new woodworker.
Marking Gauge
While a pencil line has thickness, a marking gauge scribes a razor-thin line. This hand tool is designed for one purpose: marking a line parallel to an edge.
- It provides a line far more precise than a pencil.
- It severs the wood fibers slightly, which helps guide a chisel or saw for a cleaner cut.
- It is essential for tasks like cutting mortise and tenon joints.
Our Recommendation: The Tite-Mark Marking Gauge is a favorite among professionals. Its solid brass construction and micro-adjustable gauge make it a lifetime woodworking tool.
Marking Knife
This is a step up in precision. A marking knife has a sharp, pointed blade that scores a deep, narrow line in the wood.
- It provides an exact, zero-width line for your saw to follow.
- It severs the surface wood fibers, preventing tear-out and leading to a much cleaner cut.
- It is one of those tools that once you start using, you'll wonder how you ever managed without it.
Our Recommendation: The Veritas Marking Knife features a hardened steel blade that holds a razor-sharp edge, making it ideal for precise woodworking and accurate measurements.
Carpenter's Square
For larger projects like framing or laying out sheet goods, a large steel carpenter's square is essential.
- It's much larger than a combination square.
- It's perfect for checking the square of large assemblies.
- It can also serve as a long, reliable straight edge for marking lines on large sheets of plywood.
- It's a fundamental tool for any carpenter or woodworker working on a grand scale.
Our Recommendation: The Johnson Level & Tool 7-Inch Rafter Square is a durable and affordable aluminum square that is perfect for everything from framing to small shop projects.
6. "Measure Twice, Cut Once": Tips for Accurate Wood Cutting
This old adage is the golden rule of woodworking. But "measuring twice" is only part of the equation. How you transfer that measurement and how you approach the cut are equally important for accurate wood cutting.
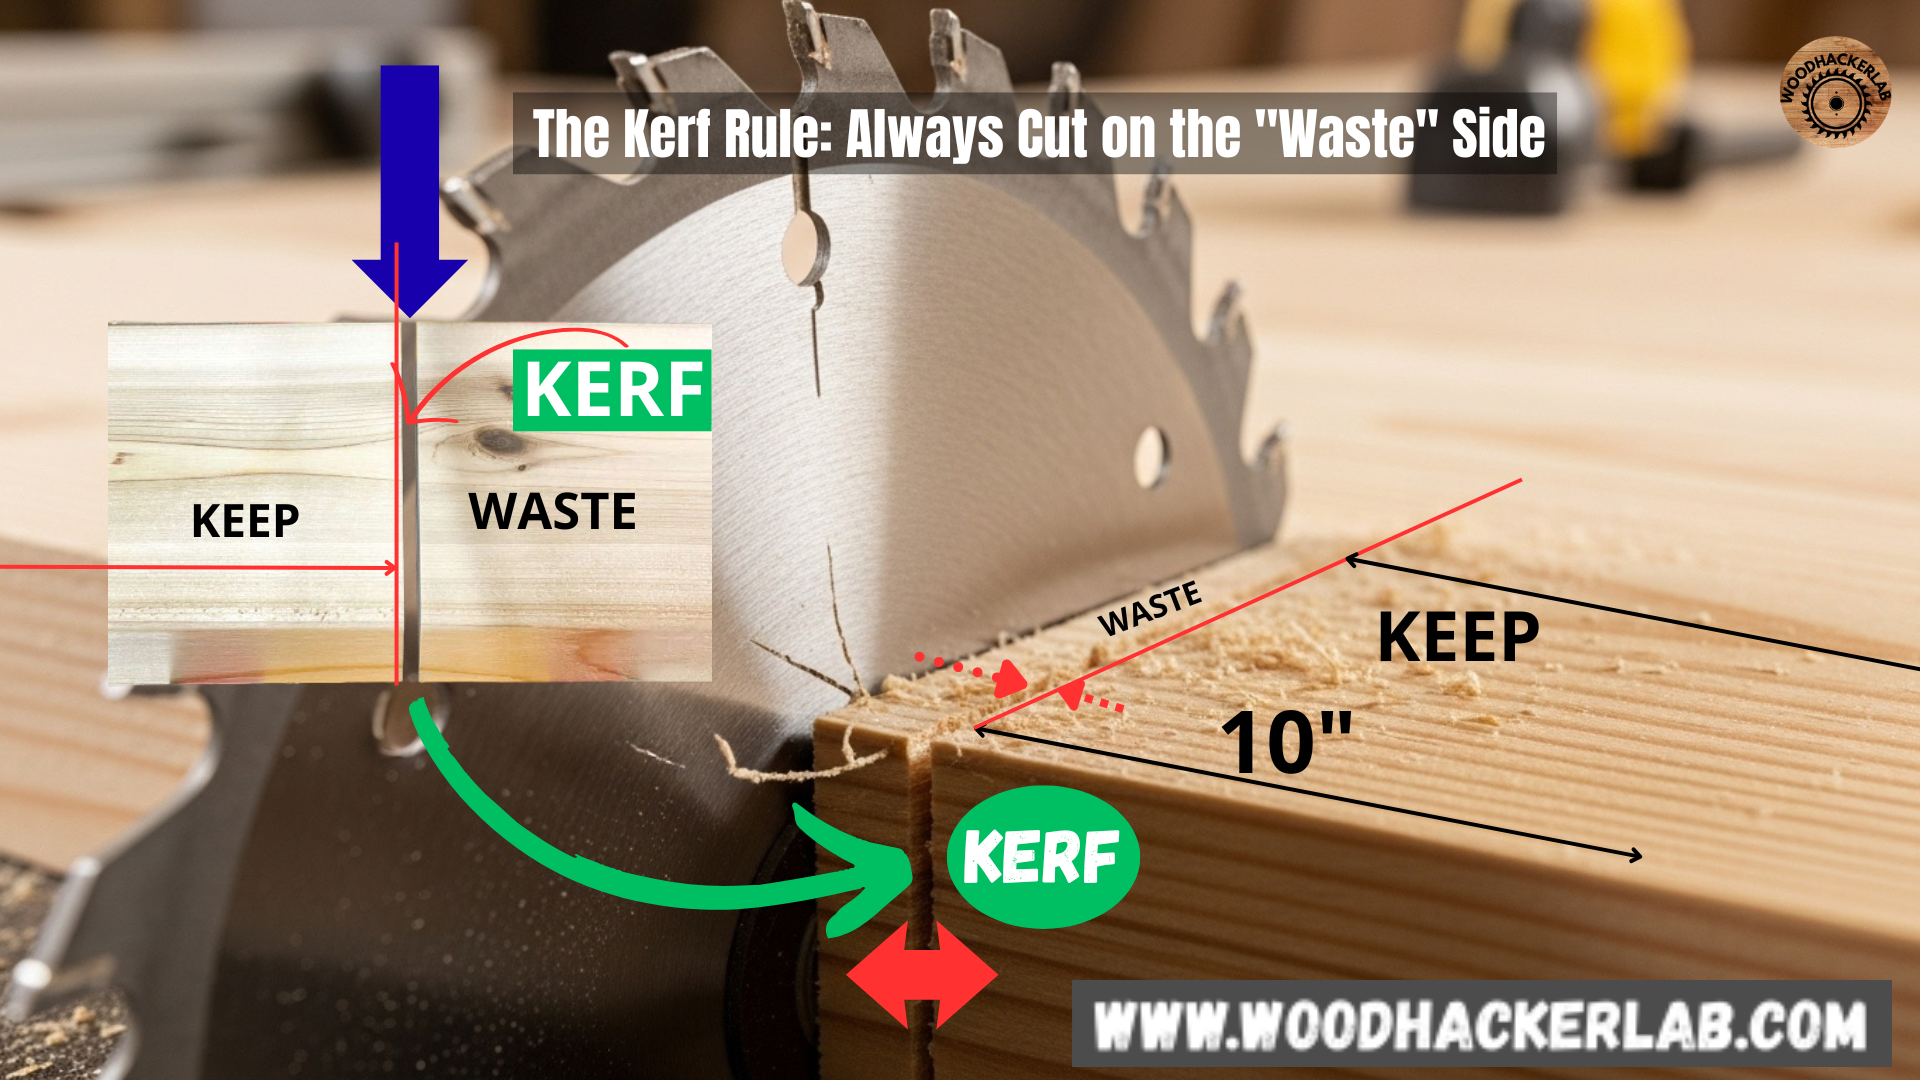
The Kerf Rule: The "kerf" is the width of the cut made by your saw blade. This means the line you mark is not the line your workpiece will be after the cut. Always cut on the "waste" side of your line. Forgetting the kerf is a classic beginner mistake that results in pieces that are 1/8" too short.
Using a Sacrificial Fence: When making precise cuts on a machine like a table saw or router, a sacrificial fence is a temporary fence clamped to your machine's main fence. This supports the wood fibers on the back edge of the workpiece completely, eliminating chip-out and leaving a perfectly clean, smooth surface.
The "Stop Block" Trick: For any woodworking project that requires multiple pieces of the exact same length, the stop block is the solution. A stop block is simply a small piece of wood clamped to the fence of your miter saw or table saw at a specific distance from the blade. You can then slide your workpiece up against the block, make the cut, and repeat. Every single piece will be identical.
From Theory to Workshop: Your Complete Plan Library Awaits.
Don't let this knowledge go to waste. Turn your passion into real, tangible projects. We've gathered a complete library to help you start.
What You Get (100% FREE):
- ✅ 50 Step-by-Step Woodworking Project Plans.
- ✅ "The Art of Woodworking" (A 440-page comprehensive guide).
- ✅ Tons of professional tips, techniques, and videos.
Conclusion: Your Newfound Confidence in Precision
You have now journeyed through the foundational elements of woodworking measurements. You can confidently read the complex fractions on an Imperial tape measure, appreciate the mathematical simplicity of the metric system, and convert between them when necessary. More importantly, you now understand that a measurement is only as good as the tools for accuracy used to transfer it. You know the difference a marking knife or a marking gauge can make, and you're equipped with professional techniques like accounting for kerf and using a stop block to ensure accurate results.
The core idea to take away is this: precision is not some mystical talent. It is a skill, built upon a foundation of knowledge and practiced through the consistent use of the right measuring tools. By internalizing these principles, you have elevated your woodworking skills immensely. You are no longer just hoping for a good fit; you are engineering it. The door to a world of more complex, beautiful, and rewarding woodworking projects is now wide open.
You've mastered the theory; now it's time for practice!
The best way to make these skills second nature is to build. Our Free DIY Kid's Picnic Table Plan is the perfect first project. It uses simple cuts and basic 2x4 lumber, allowing you to focus entirely on applying your new measuring and marking skills to create something amazing. Click here to get the free plans and start building with confidence!


